30天学会Python编程:26.Python网络爬虫编程指南
当前位置:点晴教程→知识管理交流
→『 技术文档交流 』
|
原则:爬取公开数据,避免侵犯隐私,尊重网站服务条款
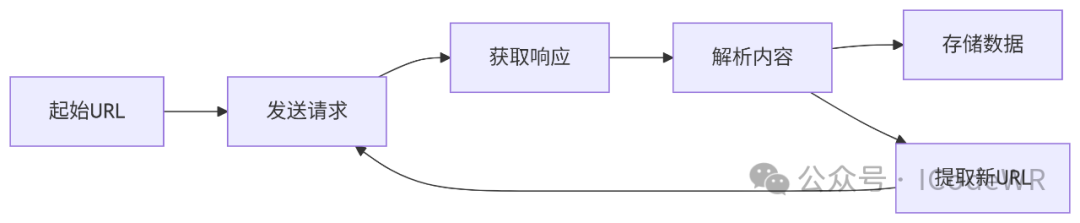
Requests是Python最常用的HTTP库,提供简洁的API:
import requests

def fetch_page(url):
    try:
        # 设置请求头模拟浏览器
        headers = {
            'User-Agent': 'Mozilla/5.0 (Windows NT 10.0; Win64; x64)',
            'Accept-Language': 'zh-CN,zh;q=0.9'
        }

        # 发送GET请求
        response = requests.get(url, headers=headers, timeout=5)

        # 检查HTTP状态
        response.raise_for_status()

        # 返回响应内容
        return response.text
    except requests.exceptions.RequestException as e:
        print(f"请求失败: {e}")
        return None

# 使用示例
html_content = fetch_page('https://example.com')
参数:
headers: 设置请求头,模拟浏览器行为timeout: 设置超时时间(秒)params: 传递URL参数(字典形式)# 1. 会话保持(处理cookies)
session = requests.Session()
session.get('https://example.com/login', data={'user': 'name', 'pass': 'secret'})
# 2. 代理设置
proxies = {'http': 'http://10.10.1.10:3128', 'https': 'http://10.10.1.10:1080'}
response = requests.get(url, proxies=proxies)
# 3. 文件下载(大文件流式处理)
with requests.get('https://example.com/large_file.zip', stream=True) as r:
with open('large_file.zip', 'wb') as f:
for chunk in r.iter_content(chunk_size=8192):
f.write(chunk)
实践技巧:
BeautifulSoup提供简单易用的HTML/XML解析接口:
from bs4 import BeautifulSoup

def parse_html(html):
    soup = BeautifulSoup(html, 'lxml')  # 推荐使用lxml解析器

    # CSS选择器提取元素
    titles = [h1.text for h1 in soup.select('h1.article-title')]

    # 属性提取
    links = [a['href'] for a in soup.find_all('a', class_='external')]

    # 文本处理
    content = soup.find('div', id='content').get_text(strip=True, separator='\n')

    return {'titles': titles, 'links': links, 'content': content}
解析器对比:
XPath提供更精确的节点定位能力:
from lxml import etree

def xpath_parse(html):
    tree = etree.HTML(html)

    # 提取文本内容
    prices = tree.xpath('//div[@class="price"]/text()')

    # 提取嵌套数据
    items = []
    for product in tree.xpath('//div[@class="product"]'):
        items.append({
            'name': product.xpath('.//h2/text()')[0],
            'sku': product.xpath('./@data-sku')[0]
        })

    return {'prices': prices, 'items': items}
XPath常用表达式:
//div: 选择所有div元素//div[@class='name']: 选择class为name的div//a/text(): 提取链接文本//img/@src: 提取图片src属性Selenium可模拟浏览器行为处理JavaScript渲染的页面:
from selenium import webdriver
from selenium.webdriver.common.by import By
from selenium.webdriver.support.ui import WebDriverWait
from selenium.webdriver.support import expected_conditions as EC

def selenium_crawl(url):
    # 配置无头浏览器
    options = webdriver.ChromeOptions()
    options.add_argument('--headless')
    options.add_argument('--disable-gpu')

    driver = webdriver.Chrome(options=options)

    try:
        driver.get(url)

        # 显式等待元素加载
        element = WebDriverWait(driver, 10).until(
            EC.presence_of_element_located((By.CSS_SELECTOR, ".dynamic-content"))
        )

        # 执行JavaScript
        driver.execute_script("window.scrollTo(0, document.body.scrollHeight);")

        # 获取渲染后的HTML
        return driver.page_source
    finally:
        driver.quit()
建议:
options.add_experimental_option("prefs", {
    'profile.managed_default_content_settings.images': 2,  # 不加载图片
    'permissions.default.stylesheet': 2  # 不加载CSS
})
直接调用数据接口效率更高:
import requests
import time

def api_crawl():
    # 分析XHR请求构造参数
    api_url = 'https://api.example.com/data'
    params = {
        'page': 1,
        'size': 20,
        'timestamp': int(time.time()*1000)  # 时间戳防缓存
    }

    # 添加认证头
    headers = {'Authorization': 'Bearer token123'}

    response = requests.get(api_url, params=params, headers=headers)
    data = response.json()

    # 解析JSON数据
    for item in data['list']:
        print(f"商品: {item['name']}, 价格: {item['price']}")
接口分析:
import csv
import json

# CSV存储(适合表格数据)
def save_to_csv(data, filename):
    with open(filename, 'w', newline='', encoding='utf-8') as f:
        writer = csv.DictWriter(f, fieldnames=data[0].keys())
        writer.writeheader()
        writer.writerows(data)

# JSON存储(适合结构化数据)
def save_to_json(data, filename):
    with open(filename, 'w', encoding='utf-8') as f:
        json.dump(data, f, ensure_ascii=False, indent=2)
import sqlite3
import pymongo

# SQLite存储(轻量级关系型数据库)
def sqlite_save(data):
    conn = sqlite3.connect('data.db')
    c = conn.cursor()
    c.execute('''CREATE TABLE IF NOT EXISTS products
               (id TEXT PRIMARY KEY, name TEXT, price REAL)''')
    c.executemany('REPLACE INTO products VALUES (?,?,?)',
                 [(d['id'], d['name'], d['price']) for d in data])
    conn.commit()

# MongoDB存储(文档型数据库)
def mongo_save(data):
    client = pymongo.MongoClient('mongodb://localhost:27017/')
    db = client['web_data']
    collection = db['products']
    # 批量插入并更新已存在文档
    bulk_ops = [pymongo.ReplaceOne({'id': item['id']}, item, upsert=True)
                for item in data]
    collection.bulk_write(bulk_ops)
存储方案选择:
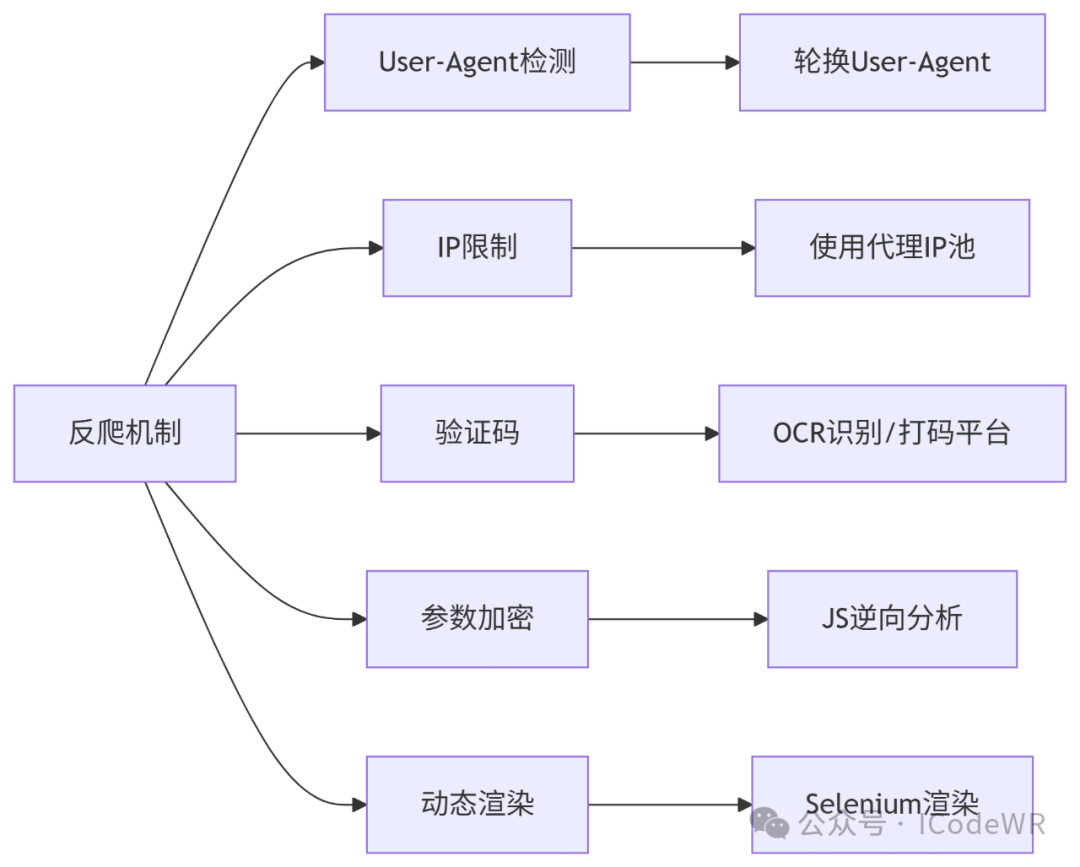
from fake_useragent import UserAgent
import random

# 代理IP池管理
class ProxyPool:
    def __init__(self):
        self.proxies = self.load_proxies()
        self.current = 0

    def load_proxies(self):
        # 从文件或API获取代理IP列表
        return ['http://ip1:port', 'http://ip2:port', ...]

    def get_proxy(self):
        proxy = self.proxies[self.current % len(self.proxies)]
        self.current += 1
        return {'http': proxy, 'https': proxy}

# 随机请求头生成
def get_random_headers():
    ua = UserAgent()
    return {
        'User-Agent': ua.random,
        'Accept': 'text/html,application/xhtml+xml,application/xml;q=0.9,*/*;q=0.8',
        'Accept-Language': random.choice(['zh-CN', 'en-US', 'ja-JP']),
        'Referer': 'https://www.google.com/'
    }

# 使用示例
proxy_pool = ProxyPool()
response = requests.get(url,
                        headers=get_random_headers(),
                        proxies=proxy_pool.get_proxy(),
                        timeout=10)
IP代理实践:
import requests
from bs4 import BeautifulSoup
import time
import random

def ecommerce_crawler(base_url, max_page=10):
    products = []

    for page in range(1, max_page+1):
        # 随机延迟防止封禁
        time.sleep(random.uniform(1, 3))

        url = f"{base_url}?page={page}"
        html = fetch_page(url)  # 使用之前定义的fetch_page函数

        if not html:
            continue

        soup = BeautifulSoup(html, 'lxml')
        items = soup.select('.product-item')

        for item in items:
            try:
                products.append({
                    'name': item.select_one('.name').text.strip(),
                    'price': float(item.select_one('.price').text.replace('¥', '')),
                    'sku': item['data-sku'],
                    'rating': float(item.select_one('.rating')['data-score'])
                })
            except Exception as e:
                print(f"解析失败: {e}")

    # 保存结果
    save_to_csv(products, 'products.csv')
    return products
import schedule
import time
from datetime import datetime

def news_monitor():
    sources = [
        {'url': 'https://news.source1.com/rss', 'type': 'rss'},
        {'url': 'https://news.source2.com/api/latest', 'type': 'api'}
    ]

    all_news = []

    for source in sources:
        try:
            if source['type'] == 'rss':
                news = parse_rss(source['url'])
            else:
                news = parse_news_api(source['url'])
            all_news.extend(news)
        except Exception as e:
            print(f"{source['url']} 爬取失败: {e}")

    # 去重并存储
    store_news(all_news)
    print(f"{datetime.now()} 抓取完成,新增{len(all_news)}条新闻")

# 定时任务配置
schedule.every(30).minutes.do(news_monitor)  # 每30分钟执行一次

# 主循环
while True:
    schedule.run_pending()
    time.sleep(60)  # 每分钟检查一次任务

提示:定期检查爬虫健康状态,建立监控告警系统,保持代码可维护性
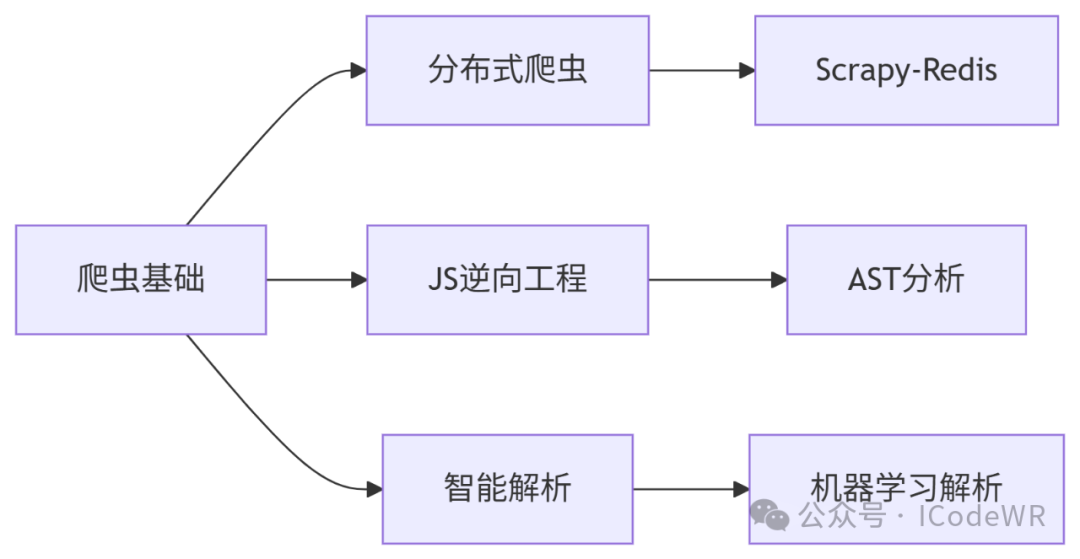
通过本指南,我们可以掌握Python网络爬虫开发的核心技能。实际开发中请牢记:"爬虫有风险,开发需谨慎",遵守法律法规,尊重数据版权,做有责任感的开发者。
阅读原文:原文链接


 400 186 1886